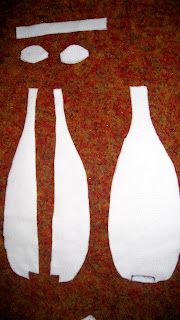
So you can kind of tell by looking at the pattern and using your thinking hat to compare it with how a duck looks how the pattern ought to fit together. sort of.(or you can compare patterns to how my photos of a duck look, for those of you who inexplicably have never seen a duck)
so obviously the two halves of the big white duck shape get sewn together and stitch the tops of the wings together, too.
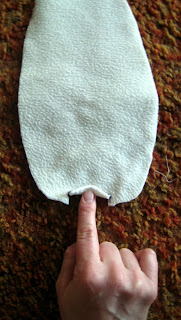
the trousers are a bit complicated (or they were for me). you have to sew the tab at the bottom of the front half to the bottom of the tab shape on the other side
then cut two small white squares
and stitch them in to each side of the sort of bridge you've just sewn like you see above.

These are the shapes from the legs and feet. just measure out a size that seems appropriate.
next you cut toes out on the slightly bigger pieces of fabric
pin the edge of one leg together and sew, then repeat for the other leg.
flip it inside out. for a moment it should look a bit like a penis. this is very important to the process.
and you've got yourself a duck leg! use a pen or screwdriver to fill it with stuffing. just like a real taxidermist. Then stuff the other one!
just like this!
the wiggle them inside the white trousers and sew them on (with white thread). I would stitch straight through the leg and trousers with each stitch (picture it like cutting a pizza, with the legs/stuffing as pizza and the trousers as crust. you would cut straight across the pizza, right?)
pin the toes so that they have a slight bump in the middle and carefully sew them on.
add a bit of stuffing to the foot and you have two perfectly good duck feet!
now sew the edges of the bottom of the legs to the appropriate area of the foot!
the trousers are a bit complicated (or they were for me). you have to sew the tab at the bottom of the front half to the bottom of the tab shape on the other side
then cut two small white squares
and stitch them in to each side of the sort of bridge you've just sewn like you see above.
hopefully yours will look a bit like this (if you can understand my jumbled instructions)
Here's the head: You wrap the long rectangle you cut around the oval shape
like this:

then pin it down and sew
leave a small hole in order to flip it inside out (to hide the seams)
ta-da!
the tail and wings are made by sewing together the identical pieces, leaving a small space to flip them inside out (again to hide the seams) then leave them to sew on in a moment.
Because now we're doing the Yellow Bits!
First cut a bill out of yellow fabric. You'll notice it's shaped a bit like a cartoon devil head. the curled horns are important as they are the duck's "smile". Next cut out a bit of red fabric roughly the same shape as the beak, but a bit smaller.
cut the yellow beak in half and sew it together to give it a curved top!
The bottom part of the beak should be a slightly smaller version of the top beak, but without the devil horns or the curve. Just make the top completely straight.
Then pin the red and yellow together and sew. I used yellow thread and you should, too!
give the beak a bit of stuffing, because no one likes a flat beak.
and now it's ready to be sewn on!
p.s. yes, the bottom beak should look like the photo above!
pin on and hand stitch it on (with more yellow thread
first sew on the top, then the bottom, and if his beak is open too wide you can just stitch a bit of the corners together.
and now for legs! because a legless duck sounds like the plot to a silly joke.
next you cut toes out on the slightly bigger pieces of fabric
pin the edge of one leg together and sew, then repeat for the other leg.
flip it inside out. for a moment it should look a bit like a penis. this is very important to the process.
and you've got yourself a duck leg! use a pen or screwdriver to fill it with stuffing. just like a real taxidermist. Then stuff the other one!
just like this!
the wiggle them inside the white trousers and sew them on (with white thread). I would stitch straight through the leg and trousers with each stitch (picture it like cutting a pizza, with the legs/stuffing as pizza and the trousers as crust. you would cut straight across the pizza, right?)
pin the toes so that they have a slight bump in the middle and carefully sew them on.
add a bit of stuffing to the foot and you have two perfectly good duck feet!
now sew the edges of the bottom of the legs to the appropriate area of the foot!
hooray!!
finally stitch on the wings and tail in appropriate looking areas and then embroider on some eyes (or buttons, you lazy thing!!) and FINALLY:
a duck is made.
I hope the instructions are at all readable. I promise I'm not drunk, I just don't know all the anatomical terms for, say, the space in-between the duck's trousers. I also promise to read up thoroughly on duck anatomy before my next post.


